The Telephone on P. E. I. - Buffing Telephones and other Plastics
 |
Yes, Virginia, it is possible to remove scratches and paint, and to and buff and polish phones.... |
*** Follow these procedures at your own risk! ***
Paint Removal:
Old phones often are scratched, and covered with paint. You cannot use paint removers on plastic phones - it will dissolve the plastic, as well as the paint. Small spots of paint can often be scratched off with a fingernail. Here is a tip abut a common household product which will safely remove paint from most plastics.
To remove latex paint spray the plastic with "Easy Off"™ oven cleaner. It will also work to some extent with oil based paints, but with more difficulty. I have used this on many phones, and have yet to see it damage the plastic. To err on the side of caution, though, test this in an inconspicuous place on the plastic before continuing.
Wearing rubber gloves, spray the plastic generously where there is paint. While Easy Off™ is gentle on the plastic, it isn't easy on hands. Wait 5 minutes, and the paint should easily rub off (oil paints will be a bit more difficult to remove and may have to be lightly scraped). Once complete, wash the item in dish soap and water, and dry thoroughly.
If you have some paint which still may not be removed, try another coating. If this fails, you may have to try a light sanding of the area using 400 grit or finer sandpaper of finishing emery paper. Once paint is removed, continue with the buffing stage to restore the plastic to factory-new sheen.
Sticker Removal:
Stickers remove easily using kerosene or lighter fluid. Pour the fluid onto a paper towel, and lay the moistened towel over the sticker. After a few minutes, use you thubnail to remove the sticker. If residue is left, repaet the process until all vestiges of the sticker are gone.
Buffing:
Buffing is an acquired skill. Practice first on an item that you don't care about. It is possible to destroy a piece until you are used to doing this. Go to a used goods store, and pick up a cheap scratched phone of any description to practice on. Practice makes perfect.
Materials Required:
1 - Low speed buffing motor (and mandrel) or bench grinder (appx. 1000 - 1500 rpm maximum, 1000 preferred). If motor speed is too high, too much heat will be produced with the plastic melting as a result. Speed at the buffing wheel may be reduced through the use of different sizes of pulleys on the motor and mandrel [See bottom of page!]. Just about any electric motor will do as long as you reduce the speed the mandrel turns at. If you have a motor which turns at the correct speed, simply buy an arbor which mounts on the motor's shaft.
2 - Loose sewn buffing wheel to fit grinder or motor. (one for each grade of buffing compound used.)
3 - light sandpaper (400 grit or finer), and very fine emery finishing paper.
4 - 1 bottle each of Novus "Plastic Clean and Shine" numbers 2 and 3. #3 is for heavy scratch removal and #2 is for fine scratch removal and polishing. You can find these materials at your local Novus Glass dealership - they may not normally sell it, but all it will take is a gentle request to have them order some in for you. I purchase mine locally at Novus in Charlottetown. You may also order it from: http://www.atcaonline.com/phone/novus.html
There may be other compounds which will work, but I have used these compounds myself, and find them excellent for the purpose.
If your wife should object to your spending money on buffing materials, tell her you are getting it to polish her bakelite and plastic jewelery! Yes, it will work on that, as well.
Scratch removal:
a) Deep Scratches - Using very fine sandpaper, lightly sand the area of the scratch so that the surface is below the level of the scratch and the surface tapers gently into the undamaged area. Using the finest grade of emery or micro-mesh finishing paper you can find, do a final light sanding. No, it won't look great yet! Next, go to step "b" below.
b) Medium Scratches - For medium scratches, apply Novus "Plastic Clean and Shine" #3 Heavy Scratch remover to a clean buffing wheel. Let dry and soak in for a couple of minutes. Now gently buff the damaged area, moving workpiece steadily, so the plastic will not overheat and melt. When done, clean work piece in water and remove buffing wheel. Continue to step "c" under Buffing and Polishing.
Note: Novus #3 works very well to restore F1 handsets which have become pitted and dull. Use as above. Be very careful using #3 on softer plastics, and use it only to repair deeper scratches. If repairing finer scratching on softer plastics, use #2.
Buffing and Polishing:
c) - For general buffing, use a fresh buffing wheel on mandrel and apply Novus "Plastic Clean and Shine" #2 fine scratch remover to it. Let soak in and dry for a couple of minutes. Buff the entire piece, moving rapidly and in a circular motion whenever possible. Re-apply compound whenever necessary. Pay particular attention to repaired areas such as areas where scratches have been removed. Use light pressure. Light pressure creates less heat, and will produce a better finish.d) - Finally, clean excess buffing compound off the piece. Do a final hand buffing with a flannel cloth.
A Success Story!
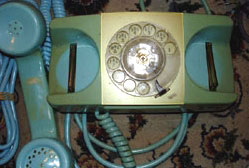
The following is an example of what can be done using this system: The first phone I polished was a Contempra phone I purchased at a bargain shop for a couple of dollars expressly for the purpose of practicing. I looked upon the piece as a write-off. This phone was severely damaged - someone, lacking a pencil, had scratched phone numbers and done their math homework carelessly on several areas of its case. When I bought it, I thought it would be good for practice, and then afterwards, good for parts only. I cleaned it first, then removed the case.
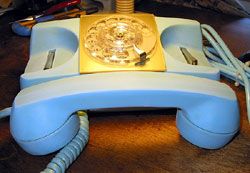
Next, as shown above, I gently sanded the most severely damaged areas, tapering the sanded area back into the undamaged areas. I then followed steps "b", "c", and "d". The results were amazing. It is impossible to tell where the deep scratches were, unless one holds the phone up to a light and notices the slight depressions in the plastic where the scratches had been.
The phone has since taken up an honoured spot in my collection. I wish I had taken before and after photos. I never expected the results I got!
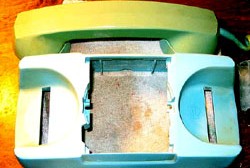
I have used this procedure a number of times to restore discoloured and faded plastics. Over time, a number of colours will fade, and often will become stained deeply with agents in the air such as nicotine as in the example shown below. To get rid of this, you need to cut below the discoloured or faded area using gentle sanding. You need to get down to a layer which is solidly the original colour. The procedure is the same whether stained or faded. One should use a small finishing sander - don't try a sander with oscillating or compound action. For the initial sanding, use a sandpaper or emery paper with 180 to 300 grit. Be careful sanding if you use any kind of power sander, as sanding heats the plastic, and can produce enough heat to cause the plastic to pool. Keep your sander in motion, and don't dwell for too long on any one spot. If you do heat an area enough to cause pooling, leave that spot so it can cool, then come back cautiously afterwards to even it out. You will have to finish off awkward spots by hand sanding. When you have the phone down to a solid colour, finish sanding with a pass of 600 grit emery paper - better, even finer micro-mesh paper, then finally, use Novus #2 polish to bring back the shine as detailed above. You will be amazed how well this can work. I do caution you, try this procedure on a phone which doesn't matter to you until you become familiar with the technique, and always do it gently. Sand down the plastic only as much as necessary.
An Impossible Case?
Building your own buffer!
There is no need to purchase an expensive dedicated buffing machine. You can build your own using a store purchased double mandrel, a yard sale motor, pulleys, switch and surface mount electrical box, and a v-belt along with a little bit of home-spun ingenuity.
If your motor speed is to high (should be around 1000 rpm - check the name plate on the motor), you can lower the speed of the wheel by using a larger pulley on the mandrel shaft end than the motor end (e.g., a 1" pulley on the motor end and a 2" pulley on the mandrel end will cut the speed by 50%).
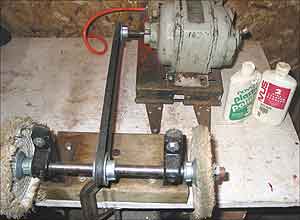
The end result may not be as pretty as an expensive dedicated buffer, but it performs well, and will cost only the price of the belt, mandrel, and motor. Note the Novus buffing compound at right.
Don't expect the table surrounding the buffing station to stay clean :-) Wear tight fitting clothing to avoid being caught in the belt, and to keep clothes clean, it is suggested that you wear a plastic or rubber apron while buffing. There is splatter!
In the photo above the more worn wheel at right is used for coarse buffing with Novus #3, the less worn and fatter wheel to the left is used for finish buffing with Novus #2. Not visible in the photo is a switchbox located behind the motor. Total cost of this machine was approximately $30.00 Cdn.
Note: on the machine as constructed, the motor mount is hinged, allowing the motor to be flipped up to quickly release the belt. The weight of the motor itself provides the tension on the belt. A belt guard is included, but removed to show the underlying construction in the photo. What I find is effective for this purpose is a piece of 4" ABS pipe, cut to wrap most of the way around the pulley. Cut off a 2 1/2 inch length, then slice it side to side. With the application of a bit of heat, it can be formed to fit the curvature and to provide a mounting bracket. This is inexpensive, and works well. If you wish a fuller guard, feel free to design one. What is certain, is there should be some form of guard on the front pulley and belt for safety's sake..
Dave Hunter,
"The Telephone on P.E.I."
https://www.islandregister.com/phones/phones.html