| Party Lines! | Pioneers! | Rural Companies! | On-line Museum! | Links! | Comments? | Home! |
Conversion Of A Northern Electric Centurion Payphone for Home Use
Member: Telephone Collector's International

|
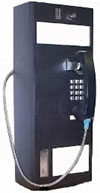
I have two Northern Electric Centurion prepay payphones in the museum, one with a brown (-26) cover, and one with black (-3). Centurions were also produced in green (-28) and blue (-27) colours. Strip those covers off, and underneath, all Centurions are the same colour - an oreangy-red designed to show from a distance when a phone had been tampered with. The Centurion is a single slot, coin line controlled "Fortress" payphone which will work on either loop start or ground start lines without modification. On this page I will detail my experiences with this phone and share notes on repairing and refurbishing this phone. The Centurion has been used by telephone companies in both Canada and in the United States. Despite dwindling numbers of Centurions in use, there are still many in service. They are a good, reliable phone with an excellent service record. There was also a Semi Postpay version of this phone, though the Prepay version was more commonly used. |
|
This is my 4th payphone conversion project, and perhaps the simplest.
Both phones I have were in their original state, not having been played with by anyone outside ot the telephone companies where they began their service. If yours has been modified these instructions may not work. Centurions are now quite common on the used market, having been made obsolete by recent advances in payphone technology, the development of the Millennium and other microprocessor controlled phones, and by the rise in cell phone useage.
Getting Started:
This conversion will work on both dial and touch-tone versions of the phone. The first step in converting a Centurion is to remove the plastic outer case. Lay your Centurion on a table front side up. You will need a t-key (order via most of the parts suppliers mentioned on the links page of this site). Insert it into the opening on top of the phone, turn it, and the cover will come loose and can be removed.
Open the red top housing using the T-key, unplug the front housing and set it aside.
If your phone has the QKB1A3 security kit installed and you don't have the correct key, have a look at the solutions I have posted to my other payphone pages (other than the suggestion mentioning prying the phone. This will destroy a Centurion). You will most likely have to drill the locks out, or have to use a hammer drill's impact to vibrate the lock's screws out. This most often isn't an issue - on all I have seen, only the t-key is required to open it, as they didn't have the optional security kit installed.
Wiring your Centurion:
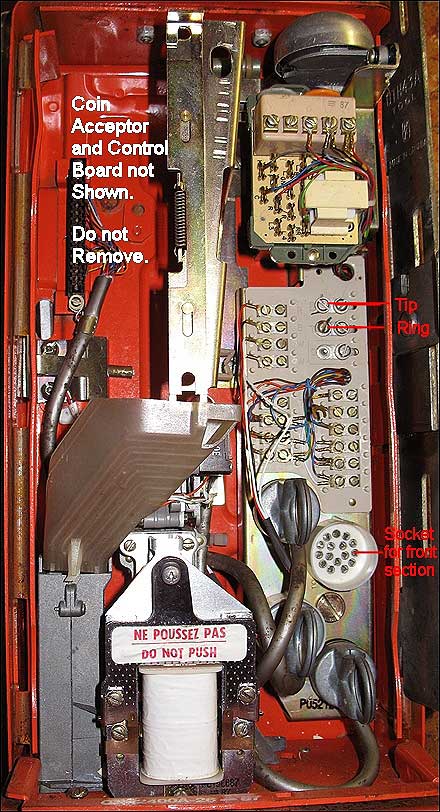
The Centurion is one of the simplest payphones to use on a home line. Connect ring and tip (red and green wires) from a modular cable to the terminals shown above. There is no need to connect the ground. The wire feeds in through a hole in the center of the back. The wire should be tied to the chassis before it exits the phone using a nylon wire tie to act as a strain relief. This will work with either the Prepay or Semi Postpay versions of the phone. In the photo above, the coin acceptor and control board are not shown. Do not remove these. Note: Hooked on the right hand side of this phone is a QTH43A parking tool. This is designed so that the front section may be hung off the side of the phone while working on it. This is for convenience only, and not necessary for servicing.
Diverting Coins to the Coin Return:
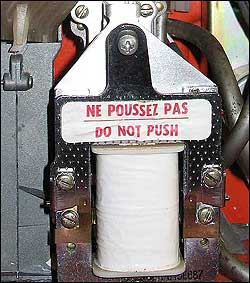
The only modification which was made was one I do to all of my payphones, and that is to set them so that any coins inserted fall directly to the coin return, rather than the coinbox. This makes it much easier to retrieve coins inevitably deposited by visitors and family. Simply gently push in the coin relay shown below [dare to be different and ignore the warning printed on the relay], and make sure the coin vane in the channel behind it directs the coins to the return, rather than to the coin box. Tie the relay in that position using a plastic wire tie. Any coins inserted will fall directly to the coin return. If you wish them to go to the coin box, do not perform this step.
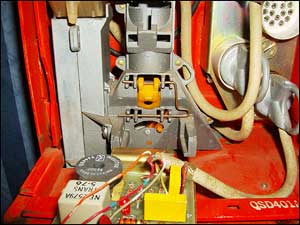
Note: If you have the Semi Postpay version of the phone, there will be no coin relay. Remove the board from the hopper as shown below. On the hopper, you will find the coin vane set with a set-screw in the direction of the coin box. This is the yellow slider shown below in the semi-circular opening. Loosen the set-screw, and adjust the vane so that it directs all coins to the coin return. The photo below shows it set in the coin return direction. Replace the board. With a Semi Postpay phone, you may find that you need to reverse the ring and tip line connections where you connected them above in order to obtain proper, coinless operation.
Semi Postpay - Photo by John Arsenault
General:
There is no need to install a network on a Centurion. It's network is built into the phone. Therefore, at this point, you can plug the front section back in, plug in the modular cord, and test the phone. When you pick up the handset, you should have dial tone. Dial. You should connect to the number called. It is that simple.
A set of the centurion circuit drawings are available - see centuriondrawings.pdf
I have several scans of Centurion Instruction cards for these phones. If your phone needs one, I have several cards in tif format that you can print out on photo stock on your colour printer using a file linked from the bottom of my links page. These cards can easily be modified to reflect your local telephone company logo. You can also download these by clicking on: https://www.islandregister.com/phones/centurioncards.zip
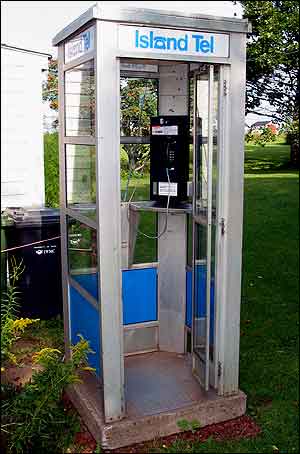
Centurion Installed in Northern Electric MD9021 Booth
The photo above shows a black Centurion residing in the phone booth in front of the museum. While in 100% working condition, this phone is not currently connected to a line.
The Centurion is a great phone - even better when it can be used. Do not attempt these modifications if you do not have at least a good basic understanding of telephone circuitry, and then do so at your own risk. Remember, that if you are going to connect the phone to telephone lines, it must be done properly. While you can own your own equipment, the telephone company owns the lines from your protector/demarcation point outward, and you can be held responsible for any damage to telephone company property.
See also my pages on the "Northern Electric N233G", "QSD3A", and "Automatic Electric LPB 82" phones.
| Party Lines! | Pioneers! | Rural Companies! | On-line Museum! | Links! | Comments? | Home! |