| Party Lines! | Pioneers! | Rural Companies! | On-line Museum! | Links! | Comments? | Home! |
Conversion Of A Northern Electric QSD3A Payphone for Home Use
Member: Telephone Collector's International
|
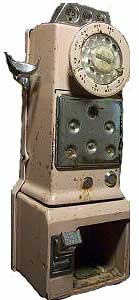
This is a Northern Electric QSD3A payphone I recently received. On this page I will detail my experiences with this phone and share notes on repairing and refurbishing this phone. The QSD3A was used by private companies in both Canada and in the United States on exchanges supporting semi-postpay phones. | 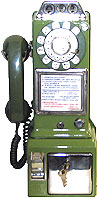 |
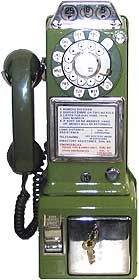
This is my third 3 slot payphone conversion project - restoring and converting a Northern Electric QSD3A payphone for home use. These phones were a semi-postpay type of phone. This is a more complex conversion than that of the Automatic Electric LPB 82 payphone, but similar to the N233G. QSD3A's in their natural state had no internal network, and were used with an external 685A subset. The phone would be connected to the subset via a wire exiting the phone, and the subset mounted below. In order to work on a phone line, a subset and/or network must be provided.
This phone was in poor shape when purchased, which led to quite a saving in the purchase price. Its handset was missing, as was the vault door and lock, the upper lock was rusted beyond use, the paint was in poor condition, and the dial surround's ceramic had been severely damaged. It apparently had been in storage for many years.
However, it did have one saving grace. It had not been converted, and no non-telephone company alterations had been made to it. It was 100% original, which to me was great news.
Getting Started:
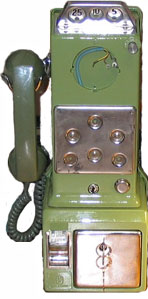
First step in working on the phone was to find a schematic for the phone, which I did through the help of fellow collectors. Next chore was to find a replacement for the damaged dial surround and for the missing handset. Luck prevailed, and I soon had a new dial surround on the way from another collector. It was green - not really a problem as I had hoped to change the colour anyway. These phones had originally been manufactured in three stock colours, black, beige, and moss green. My N233H was black, and my Automatic Electric payphone was beige so this turned out to be a fortunate coincidence, as this would give me the third colour when I refinished it in green. I had a junked Northern Electric 565 set with a matching green handset, so decided to use its handset with the payphone. A original outer instruction card frame to replace the missing one was located through the same collector who provided the dial surround. I was fortunate enough to have a 685A subset already. Finally with everything gathered, it was time to get to work refinishing the phone.
Refinishing:
First on the to-do list for this phone was to clean it thoroughly, then refinish it. With telephones unlike furniture, a well done refinishing job will increase its value, especially if it is in as rough shape as this was. This is due in part to the fact that it is normal for a telephone to be refurbished. Most payphones suffered hard use, and many were refurbished several times by Telcos during their life-time. Refurbishment could include refinishing, replacement of damaged parts, and upgrading wiring and components.
I spent several days completely disassembling the phone, taking notes as I went, then removing the old paint with paint stripper and sanding the phone back to clean metal with emery paper. This included the interior, and particular attention was paid to the the upper and lower housing and any other area which had rust or scratches in the metal. The backboard also was stripped, preserving the Northern Electric model stamp which was masked off carefully. All components which could be removed were removed, and set in a safe place.
Immediately prior to repainting, all parts to be refinished were blown off using air from a compressor and a blow-gun, then a tack cloth was used to remove any remaining particles. Nothing would be more frustrating than to find flaws in your new paint job due to failure to take this step. When refinishing your phone, pay attention to detail; time taken in preparation for refinishing is never wasted time, and will be rewarded in the quality of the finished job. I have received other metal phones whose previous owners had skipped this step and achieved truly dissappointing results for the amount of labour they must have put into them.
Paint was a bit of a problem. Few of the local paint stores had a paint colour closely resembling the Northern Electric 51 green. I finally located one paint, and brushed it on. No amount of brushing could produce good results - brush strokes were inevitable. I finally gave up on this and stripped it down again to bare metal.
After an exhausting day searching for another solution, I came across a local automotive paint dealer who sold a very high quality acrylic automotive enamel, and went through his colour cards. After searching many colour books, I did find one colour which was similar, but much brighter. It was a non-metallic paint colour made for a 1984 Hyundai, named Jade Mist. Now, as this paint was a custom made paint, we added 3 grams of carbon black to tone it down. Then it was made up into two spray cans by the dealer. It turns out that the colour could have been toned down more for a better match, perhaps 8 to 10 grams of the black added, as this paint didn't darken much as it dried. However the quality of the paint was superb, covering with a blemish-free mirror finish in one coat. A second coat was applied inside and out to ensure 100% coverage.
Each of the major sections of the phone were placed over hot air registers in our home once they had dried to the touch for a day before re-assembly was begun. Using notes taken during disassembly, the phone was then re-assembled. The difference was incredible!
General notes:
This phone was designed to be, and will be used with a 685A-3 subset, rather than modifying the phone and adding an internal network and ringer.
Now, at this point it is time to discuss the differences between this phone and the N233H. The case castings, and many of the internal parts are identical. But that is where the similarities end. The N233H is a prepay phone. It has a coin relay mounted on the coin hopper. This phone, the QSD3A, a semi-postpay phone, has no relay on the hopper, and its coin vane is fixed in the direction of the coin-box. Replacing the coin relay, is a small relay mounted beside the coin hopper. A micro-switch, activated by a trigger lever to the coin channel signals when a coin is dropped. No provision is made for the return of coins, except that those deposited in the wrong slots are returned automatically.
This phone requires few modifications to work on home lines. When hooked up properly to a 685A-3 subset, you will have two options when you hook it up: 1. Connect it as shown in its schematic, tip to tip, ring to ring and it work as a standard phone. 2. Connect it reverse battery, i.e. tip to ring and ring to tip. The transmitter will be muted when you go off hook and you have to deposit a dime to dial or talk.
Handset Replacement:
The handset was missing from this phone when purchased. A handset from a 500 series set may be used with these, with slight modification. The exposed length of wire on the phone end of the cord has to be 19 centimetres long. It is a simple matter to cut back the insulation on the phone side of the handset cord to make it suitable for use on the phone. One of the white leads will be too long, and will need to be tucked out of the way (the one going to GN on the switch assy.) See David Massey's "233G site" for a detailed photo of the needed modification. The handset cord enters the outside hole, loops around and passes through a large hole in to the phone, then over to and under the brass handset cord retainer, the insulation ending approximately 1 centimeter to the right. It is held in place by a setscrew at the point at which it enters. The handset is connected as follows:
- One lead wire from the handset goes to the GN contact of the switchhook assembly.
- The other white lead goes to the TR terminal of the top terminal strip.
- The black lead goes terminal 1 of the relay.
- The red lead, goes to the T terminal of the top terminal strip.
Diverting Coins to the Coin Return:
The only modification which was made was one I do to all of my payphones, and that is to set them so that any coins inserted fall directly to the coin return, rather than the coinbox. This makes it much easier to retrieve coins inevitably deposited by visitors and family. On this phone, this modification is a little more difficult than the same on the N233H, Centurion, and on the Automatic Electric. The vane which redirects the coin to either side is fixed in position towards the coin box by means of a small screw, which prevents the vane from falling towards the coin return side. To move it over to the return side, one must first remove this screw, flip the vane then re-insert the screw. Once this is done, there is still enough movement in the vane that some means must be used to keep it over on the right hand side. One could re-drill the hole the screw is driven in to a bit to the right, but this is a major modification, and I don't recommend it. One could, as another collector suggested, bend a small wire held by the original screw which would hold the vane over to the right. I chose a simpler expedient - a very small dab of clear silicone sealant over the arm coming from the vane, which performs the same task - that of keeping the vane all the way to the right.
Connecting to 685A Network:
- R on the network goes to BB on the transfer contacts.
- GN on the network goes to TR on the top terminal strip.
- B on the network goes to T on the top terminal strip.
- RR on the network goes to terminal 1 on the relay.
- L1 (Ring) on the network goes to Y on the transfer contacts.
- L2 (Tip) goes to L on the top terminal strip.
Note: you may have to make the following changes inside your 685A network depending upon its former use:
- 1) Remove Blue strap between RR of network and L1 of terminal block (only necessary on 685A subset).
- 2) Move the slate brown strap from 2 to L2 of the terminal block (only necessary on 685A subset).
Using Other Networks:
A standard 425A network from a 500 type phone can also be used. In this case, the L1 and L2 connections are made directly to the phone's L contact at the top, and the Y transfer contact. All other connections (R, GN, B, C, RR) are shown below. The network should be insulated (use your imagination, i.e. a sandwich bag, and located in the coin box area). A small ringer and capacitor could also be hidden in this area. As above, I suggest you set the phone so it shunts all coins to the coin return to keep coins away from the network.
- R on the network goes to BB on the transfer contacts.
- GN on the network goes to TR on the top terminal strip.
- B on the network goes to T on the top terminal strip.
- RR on the network goes to terminal 1 on the relay.
- C on the network goes to L on the top terminal strip.
- L1 (Ring) on the network goes to Y on the transfer contacts.
- L2 (Tip) goes to L on the top terminal strip.
As pointed out by Stan Schreier in a recent article on the ATCA (Antique Telephone Collectors Association) site, a more modern network may also be used, e.g. one from a Contempora phone, or an ITT 427 or 1427. These are smaller than the 425A and will fit nicely into the coin box area. In his article, Stan shows a close-up of my phone and a close-up of its relay, and the connections to Contempora, ITT 427 or 1427 networks.
Locks and Keys:
The Northern Electric QSD3A uses an NE-22 lower (coin door) lock, and an NE-21B upper lock. Do your utmost not to destroy the upper lock. The NE-21B upper lock is universal - NE21B keys for this may be ordered from a number of sources, including Phoneco in Galesville, Wi. To ask about ordering keys and locks, use the "Questions or Comments" form provided on their page - locks are listed on their catalogue pages, the keys aren't. The same is true of upper locks only for 3 slot payphones manufactured by Western (10-G lock and key) and Automatic Electric (29-S lock and key) as well. Just state what manufacturer of phone you have - they will do the rest. Another source of upper lock keys is Customphones in Indianapolis, In.
If you know someone who has a similar phone, their key should open the upper section for you while you await your key. If you try an NE21B key, and it fails to work, also try a WE10G key - the lock might have been changed at some point in time to a Western Electric. They are, other than keying, interchangeable.
My upper lock is broken. Now, how do I det the darn thing open? I ran across this in the case of my QSD3A - its lock was hopelessly rusted, and even with the correct key it couldn't be convinced to open. While I don't personally recommend this procedure, it will work if done carefully - only try it if you have previously obtained the correct upper lock key and it doesn't work. Pad a wide flat bladed screwdriver with cloth, and place it in the crack between the upper and lower sections. Pry gently. With luck, this will allow the two sections to separate. Be very careful and apply only moderate force - it is possible to crack the castings doing this. The upper lock can then be removed and replaced with a working one. This should be used as a last ditch attempt only.
Now, how do you open the coin door if you don't have a key for it? Lower locks (coin door locks) on all 3 slot phones are individually keyed, regardless of manufacturer.
First of all obtain a key for the upper lock, and remove the upper section of the phone. Note the location of the wires going to the coin relay then disconnect them - these can be reconnected later. Then with a large screwdriver, remove the screws which hold the lower box to the backboard. If there is no coinbox in the phone, you will then be able to access and remove the lock from the backside of the door by unscrewing its 4 bolts. These may require a long hex driver to remove depending upon the bolt type used. A new lock complete with key may then be used to replace it, as chances of finding a key to fit your existing lower lock are slim. These may also be ordered from Phoneco (complete doors complete with lock and key also are available).
If there is a coinbox in the phone (most often they aren't), you will not be able to access the screws holding the lock by doing this. If you know a friendly neighbourhood locksmith or felon, let 'em have a go at it - should they fail, follow these instructions at your own risk: One way to open the door is to very carefully drill out the tumblers of the lock with a titanium drill bit. Once the tumbler is out, the slider of the lock can be released. The metal in the tumblers of these locks is very hard. They were made for security, not for ease of opening. Start with a small bit, then graduate up to a larger bit. This must be done carefully to avoid damaging the door. Taping the area surrounding the lock with a few layers of masking tape may help reduce the risk of scratching the door should the bit slip during this procedure
Another suggestion with merit is to use a hammer drill on the lock with a blunt bit - try this first! Once again, tape carefully around the lock. This will vibrate the bolts holding the lock on and they will vibrate off. This idea has definite merit, as with the last method, drilling the lock, it requires a lot of fiddling still to get the lock released. This merely drops the lock off inside the phone and allows it to open!
Remove the lock and replace with a new one with matching keys.
The QSD3A is a great phone - even better when it can be used. Do not attempt these modifications if you do not have at least a good basic understanding of telephone circuitry, and then do so at your own risk. Remember, that if you are going to connect the phone to telephone lines, it must be done properly, and connections must be made through a proper network. While you can own your own equipment, the telephone company owns the lines from your protector/demarcation point outward, and you can be held responsible for any damage to telephone company property.
Thanks to Steph Kerman, Bill Wright, and Stan Schreier for their assistance and advice on this phone.
See also my "Northern Electric N233G", "Centurion" and "Automatic Electric LPB 82" Conversion Pages!
| Party Lines! | Pioneers! | Rural Companies! | On-line Museum! | Links! | Comments? | Home! |